
You upload a great image, hit publish, and expect it to show up in Google Images ,but it never does. That’s where Image SEO comes in.
Image SEO means optimizing your pictures so search engines can understand, index, and rank them properly. It’s not just about adding alt text or compressing files anymore. In 2026, Google’s AI can recognize faces, read on-image text, and even connect visuals to real-world entities and topics.
Well-optimized images do more than enhance your website’s look. They improve loading speed, boost rankings, and help your pages appear in Google Images, Discover, and AI Overviews.
In this guide, you’ll learn how to optimize your visuals step by step ,so every image you upload works harder for visibility, traffic, and trust.
What Is Image SEO and Why It Matters
Image SEO means optimizing your images so search engines can understand, index, and display them effectively in search results. It includes steps like compressing files for faster loading, using descriptive file names, writing accurate alt text, and adding structured data to help Google connect visuals with page content.
Today, images are more than just decoration ,they’re key to how people discover and interact with content online. Search engines now recognize what’s inside an image, read text overlays, and even match visuals to search intent through AI and machine learning. That means an optimized image can appear not only in Google Images but also in Discover, Lens, and AI-driven overviews.
When your visuals load quickly, describe real context, and align with your content topic, they boost visibility, user engagement, and rankings across all types of search experiences.
How Search Engines Understand and Index Images
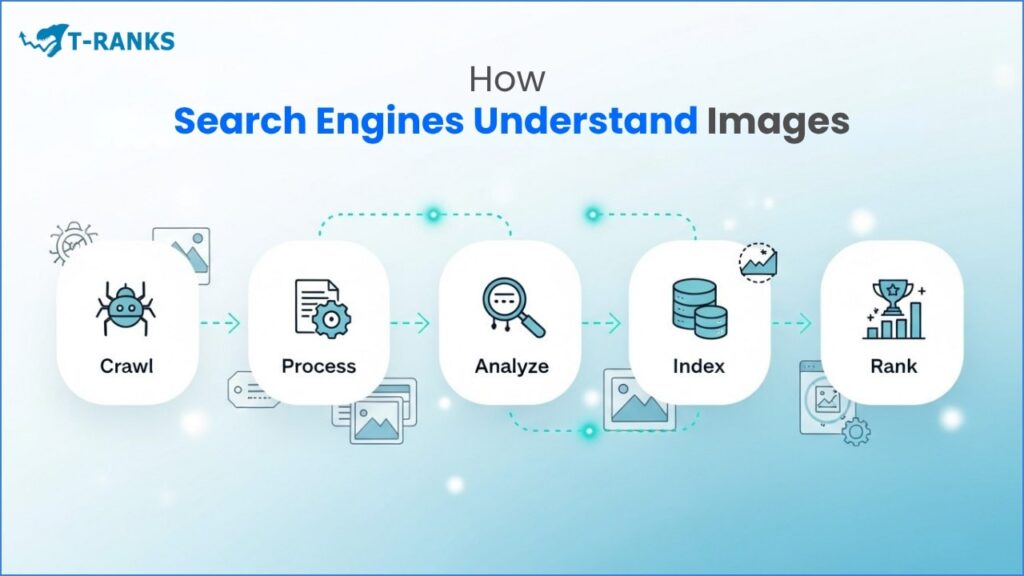
Images don’t just make a page look good they help search engines understand what your content is about. When Google crawls a page, it scans your images just like your text. It looks at file names, alt text, captions, EXIF data, structured data, and the surrounding text to determine what each image represents.
Crawlers discover images through HTML <img> tags, sitemaps, or embedded media inside pages. Once found, Google processes the image, analyzing its content, context, and quality. Factors like compression, dimensions, and load time all affect whether an image is indexed and how it ranks. When these signals align with user intent, your image becomes eligible to appear in Google Images, Discover, Lens, or image packs on regular search results.
To help your images get properly indexed:
- Use descriptive file names that reflect what’s in the picture.
- Write accurate alt text that supports accessibility and helps search engines “see” the image.
- Keep captions relevant and aligned with your article topic.
- Add structured data (such as ImageObject) with details like author, license, and dimensions.
- Include your images in XML sitemaps so crawlers can find them even if they aren’t linked directly on the page.
When these elements work together, your visuals become searchable assets that strengthen your overall topical authority.
Where Images Appear in Search Results
Modern search results show images in many forms — not just in the “Images” tab. Optimized visuals can appear across multiple surfaces, including:
- Image Packs: Small clusters of visuals that appear in standard Google search results when the query has visual intent.
- Google Images: Dedicated visual search results, showing thumbnails and related queries based on your metadata and content relevance.
- Google Discover: Personalized content cards where eye-catching, well-structured images increase click-through rates.
- Google Lens: AI-powered visual recognition that identifies real-world objects and finds matching results online. Consistent entity data and clear schema improve Lens visibility.
- Featured Snippets: Images that illustrate a clear answer, pulled from authoritative and well-structured pages.
- Social Previews: Thumbnails shown when your pages are shared on LinkedIn, Facebook, or X. Proper Open Graph and Twitter Card metadata ensure brand-consistent visuals.
Understanding where your images can appear helps you optimize not only for rankings but also for cross-platform visibility and brand exposure.
Pro Tip – Improve Image Discovery Fast
Use Google Search Console→ Search Type → Image to track which pages gain new image impressions and clicks after optimization. It’s the quickest way to confirm your visuals are getting indexed and appearing in Discover or Lens.
How to Select and Create Images That Build Authority and Engagement
Every image should serve a purpose. Great visuals don’t just decorate a page — they clarify, support, and persuade. In SEO, images act as E-E-A-T signals, showing that your content is original, relevant, and trustworthy. A good image improves understanding, builds engagement, and strengthens both UX and ranking potential.
Principles for Selecting and Creating Images
- Match intent. Choose visuals that answer what the user came to see — tutorials need process shots, comparisons need side-by-side visuals.
- Use original images. Real team photos, screenshots, and product visuals build authenticity and outperform stock graphics in engagement.
- Stay on brand. Keep a consistent color palette, tone, and style. A clear visual identity reinforces brand recall and trust.
- Prioritize clarity. Avoid cluttered backgrounds or tiny text. Make sure any overlayed text is readable on mobile screens.
- Add context. Place each image near related text and use short captions where needed to reinforce meaning.
Choosing the Right Type of Image
- Product or service pages: Multiple angles, close-ups of key features, and lifestyle usage shots.
- Blogs and guides: Step-by-step screenshots, comparison charts, or simple diagrams that replace long paragraphs.
- Case studies or local pages: Real people, authentic workplaces, and result visuals — not generic office stock.
Original visuals communicate expertise and experience. Stock photos can support layout balance but should be customized — cropped, recolored, or branded — to avoid duplication and maintain uniqueness.
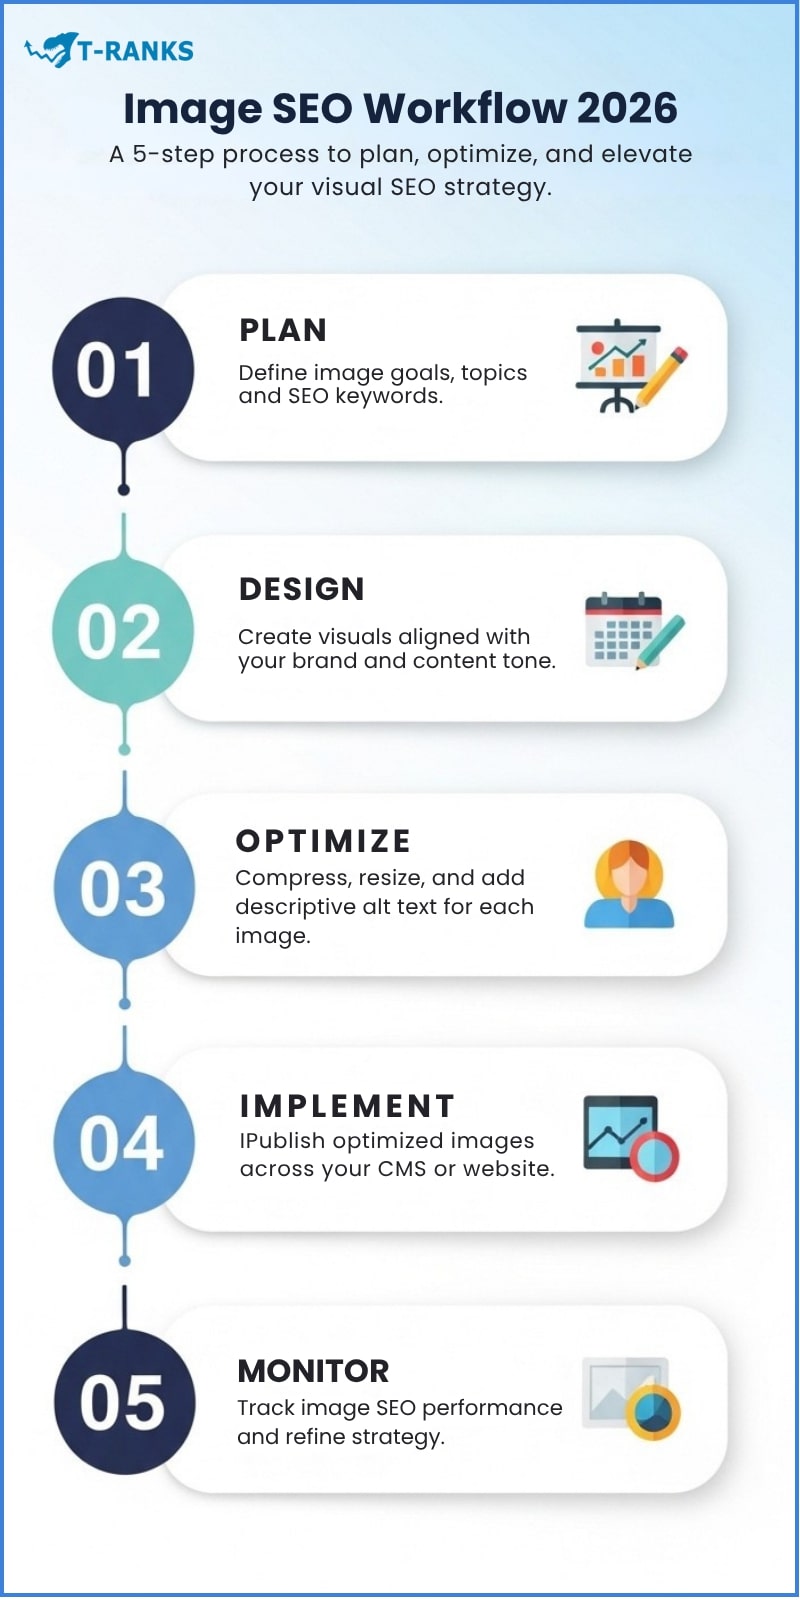
Fast and Scalable Creation Workflow
- List 3–5 visuals that best explain the page’s key ideas.
- Capture or design them with consistent lighting and typography.
- Check readability on mobile (320–390 px width).
- Verify copyright and licensing before upload.
- Hand off for optimization: rename, compress, and add alt text and schema.
Pro Tip: Build a reusable image kit for each content type (cover, step frame, comparison chart). It speeds up production and keeps your visual SEO consistent across articles..
Supported Image Formats: Picking the Best for SEO
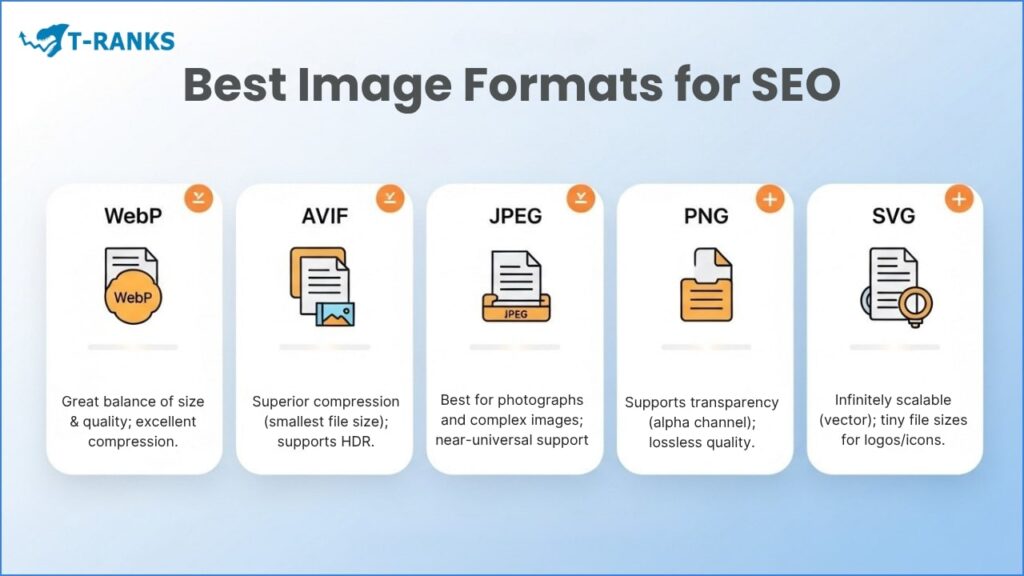
Selecting the right image format is essential for both SEO performance and user experience. The goal is to balance visual quality, file size, and browser compatibility. Modern formats like WebP and AVIF outperform traditional ones like JPEG or PNG by loading faster and improving Core Web Vitals metrics such as LCP and CLS.
Quick Comparison of Image Formats
| Format | Best For | Key Advantages | Limitations | SEO Impact |
| JPEG (.jpg) | Photos, gradients, rich color images | Small file size, widely supported | Quality loss on heavy compression, no transparency | Reliable choice for speed, but WebP/AVIF are lighter |
| PNG (.png) | Logos, icons, graphics needing transparency | Crisp edges, lossless quality | Large files, slower loads | Great for clarity and UI; compress to maintain speed |
| WebP (.webp) | General use (photos + graphics) | 25–35% smaller than JPEG, supports transparency & animation | Slightly higher CPU load on old devices | Ideal all-round format for SEO and Core Web Vitals |
| AVIF (.avif) | High-res, mobile-first, performance sites | Superior compression, color accuracy, transparency support | Slower encoding, limited old-browser support | Best for top speed; pair with WebP fallback |
| SVG (.svg) | Logos, icons, vector illustrations | Infinitely scalable, editable via CSS, tiny size | Not for complex photos | Must-have for branding, crisp and responsive |
| GIF (.gif) | Simple animations | Universal support, quick loops | Large size, limited colors | Replace with animated WebP or short MP4 |
| Legacy (BMP, TIFF) | Rare legacy assets | High detail | Extremely heavy | Avoid entirely for web pages |
Choosing the Right Format
- Use WebP for most web visuals (blog, e-commerce, product pages).
- Use AVIF for hero images and mobile-first layouts.
- Keep PNG for transparent graphics or icons.
- Use SVG for logos and vector UI.
- Avoid GIFs unless animation is critical.
Pro Tip: Serve WebP or AVIF by default and add a JPEG or PNG fallback using the <picture> tag for full compatibility.
<picture>
<source srcset=”hero-image.avif” type=”image/avif”>
<source srcset=”hero-image.webp” type=”image/webp”>
<img src=”hero-image.jpg” alt=”Optimized image format example”>
</picture>
This setup ensures modern browsers load the best-performing version while older ones still display the fallback image seamlessly.
Image Compression, Resizing & Performance Optimization
When someone visits your site, your images are often the first thing that loads — and the first thing that can slow everything down. Large, unoptimized visuals don’t just waste bandwidth; they frustrate users, trigger higher bounce rates, and hurt your Core Web Vitals, especially Largest Contentful Paint (LCP) and Cumulative Layout Shift (CLS).
That’s why image compression and resizing are essential for SEO. Compression reduces the file size so pages load faster, while resizing ensures each image fits its space perfectly instead of forcing the browser to scale it down. The result? Your website feels lighter, faster, and more professional — and search engines reward that kind of performance with better rankings and improved crawl efficiency.
Why It Matters for SEO and Users
Imagine visiting a page where a single hero image takes five seconds to appear. Even if the content is great, users might leave before reading a word. Google notices this behavior — and pages with slow-loading visuals tend to drop in rankings.
By optimizing your images, you:
- Help Google crawl and index visuals faster.
- Improve Core Web Vitals, which directly affect SEO.
- Keep visitors engaged longer and reduce bounce rates.
- Make your website accessible and mobile-friendly.
Every compressed image is a silent boost to both performance and discoverability.
Top Image Compression Tools
| Tool | Best For | Highlights |
| TinyPNG / TinyJPG | Bloggers & small sites | Fast drag-and-drop compression for PNG and JPEG |
| Squoosh (Google) | Developers | Live preview, fine-tuned settings, and WebP/AVIF export |
| ShortPixel | WordPress users | Automatic compression + next-gen format conversion |
| Kraken.io | Agencies | Powerful API for bulk and automated workflows |
| Imagify | CMS users | Lazy loading, resizing, and compression on upload |
| Cloudinary | Enterprises | Real-time transformation and CDN delivery |
| Optimole / Smush | Beginners | One-click optimization inside WordPress |
Smart Resizing Practices
- Resize before upload. Don’t upload 4000 px images for a 600 px space — scale first.
- Set image dimensions. Add width and height so browsers reserve space early, preventing layout shifts.
- Use srcset and sizes. Let browsers choose the right image size for each screen.
- Add retina versions. Use 2× versions for sharpness on high-DPI displays.
- Keep thumbnails tiny. Compress aggressively for galleries and grids.
Balancing Visual Quality and File Size
Compression isn’t about destroying quality — it’s about keeping what matters.
- Lossy compression (JPEG, WebP) is perfect for lifestyle images or blog visuals.
- Lossless compression (PNG, AVIF lossless) works best for graphics and UI elements. Aim for under 100 KB for regular visuals and under 200 KB for hero banners. Always preview to make sure the image still looks sharp.
Next-Gen Formats & Automation
Modern formats like WebP and AVIF make image optimization almost effortless. They’re lighter, faster, and visually identical to heavier JPEGs. Tools like ShortPixel, Imagify, or Optimole can automatically convert and compress images on upload, while CDNs such as Cloudflare or Cloudinary handle responsive delivery and caching worldwide.
SEO Benefits You’ll Notice
- Faster pages and better Core Web Vitals = higher rankings.
- Lower bounce rates and higher conversion rates.
- Better crawl efficiency, since lighter pages let Googlebot cover more ground.
Pro Tip: Before uploading, always aim for under 100 KB per image on blog posts and under 200 KB for hero banners or homepage visuals. Compress files using tools like TinyPNG, Squoosh, or ShortPixel until they reach that range without looking blurry. Smaller, well-optimized images load faster, pass Core Web Vitals, and keep your readers engaged instead of waiting for the page to render.
6. Descriptive File Names & Folder Structures
Search engines like Google no longer just see an image they can read text within it, interpret context, and connect visuals to entities using AI-driven image analysis. That means your SEO success depends not only on image quality, but also on how well you name, label, and organize those images. A well-structured file system gives Google consistent clues about what each image represents, improving visibility in Image Search, Discover, and Lens results.
Why File Names and Folders Matter
Your file name is one of the first signals Google uses to understand image content. When an image is called IMG_1234.jpg, it provides zero context. But organic-cotton-baby-sleepwear.webp immediately communicates relevance, helping search algorithms connect the image to related search intents.
Example comparison:
| ❌ Don’t Use | ✅ Use Instead |
| IMG_789.jpg | cotton-baby-romper.jpg |
| photo1.png | seo-audit-report-example.webp |
| screenshot.png | keyword-research-dashboard.webp |
Every descriptive file name adds a layer of clarity improving indexing accuracy, entity alignment, and click potential in image-rich SERPs.
How to Create SEO-Friendly File Names (5 Simple Steps)
- Describe the subject clearly. Include what the image actually shows (product, topic, or use).
- Keep it short and natural. Use 3–6 words in lowercase — readable to both humans and bots.
- Separate words with hyphens. Avoid underscores or spaces (baby-shoes.webp not baby_shoes.webp).
- Include keywords only when relevant. Don’t stuff; use them naturally.
- Match your site’s language and format. Use .webp or .avif for best SEO performance.
Example: /images/products/leather-office-chair-black.webp /images/blog/internal-linking-guide.webp
Organizing Image Folders for Scalability
Your folder structure should mirror your website’s content hierarchy. This helps crawlers associate visuals with topics, while making your own media library easy to manage and audit.
Recommended folder layout:
/images/
/products/
/category/
product-name.webp
/blog/
/featured/
article-topic.webp
/team/
staff-name.jpg
Implementation tips:
- Keep folder names short, descriptive, and keyword-aligned.
- Group images by category, section, or project (e.g., /blog/featured/, /products/shoes/).
- Avoid cluttered paths like /uploads/2025/10/final-images/.
- For multilingual sites, create localized folders (/es/images/productos/).
- Use CDNs or subdomains (cdn.t-ranks.com/images/…) for faster delivery and global caching.
Practical Workflow for Large Sites
- Use Bulk Rename Utility (Windows) or NameChanger (Mac) for mass renaming.
- In WordPress, automate using Media File Renamer or FileBird.
- For ecommerce or SaaS, sync image names with SKU or product IDs for consistency.
- Maintain one master spreadsheet that tracks filename patterns and upload dates.
Pro Tip:
Adopt a consistent naming format like category-keyword-brand.webp. For example, blog-image-seo-guide.webp or product-organic-bamboo-shirt.webp. This keeps your files organized, boosts relevance signals, and makes future audits or migrations effortless — no need to guess what each image represents again.
Alt Text Optimization: What It Is and How to Do It Right
Alt text (short for alternative text) is a short written description of an image that helps both search engines and users understand what the image shows. It appears in your website’s HTML inside the <img> tag as the alt attribute:
<img src=”image-seo-example.webp” alt=”Chart showing SEO traffic growth from image optimization”>
Alt text serves two key purposes:
- Accessibility: Screen readers use it to describe images to users who can’t see them.
- SEO & Indexing: Search engines read it to understand image content and match it to search queries.
So, alt text bridges the visual and textual worlds — it tells Google what your image means and helps it appear in Google Images, Discover, and AI Overview results.
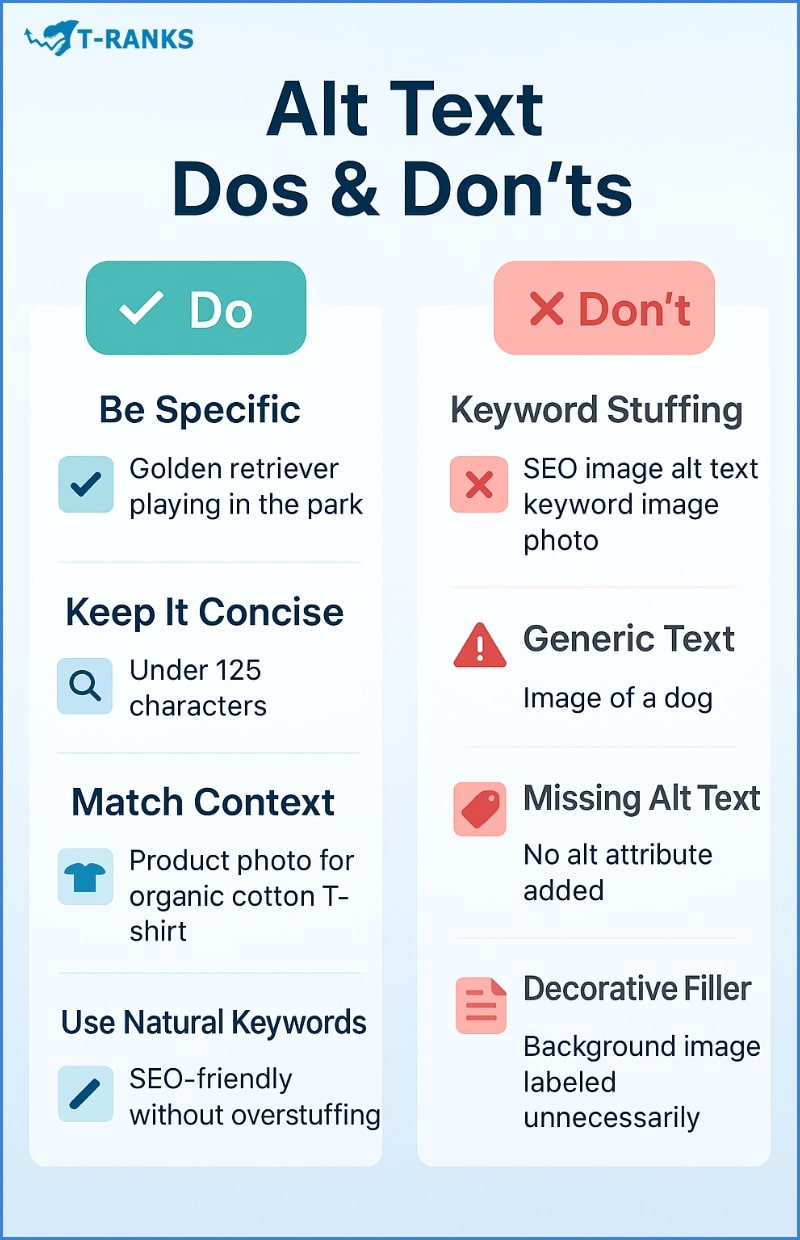
Best Practices for Writing Alt Text
Follow these simple rules to write alt text that’s clear, helpful, and SEO-friendly:
- Describe what you actually see. Focus on the subject and action in the image. Example:
- ✅ “Woman wearing organic cotton sleepwear”
- ❌ “Image of a woman”
- Keep it short and natural. Aim for under 125 characters — long enough to give meaning, short enough for screen readers.
- Use relevant keywords naturally. Include one key phrase only if it fits the description. Don’t stuff or repeat it. Example: “Blue running shoes for marathon training”
- Avoid filler words. Skip “image of,” “photo showing,” or “picture of.” Search engines already know it’s an image.
- Match page context. The alt text should reflect what the image contributes to the content — not just what it looks like.
- Leave decorative images empty. Use alt=”” for icons, spacers, or background visuals that don’t add meaning.
- Vary descriptions. If similar images appear on the same page, write slightly different alt text for each one to add variety and depth.
Quick Examples
| ❌ Bad Alt Text | ✅ Optimized Alt Text |
| “Image of SEO” | “Graph showing SEO traffic growth after backlink campaign” |
| “Photo of kids” | “Two kids wearing matching organic cotton pajamas” |
| “Chart” | “Bar chart comparing keyword rankings before and after optimization” |
Pro Tip: Write alt text as if you’re explaining the image to someone over the phone. Be brief, specific, and natural. That mindset will automatically keep your alt text clear, relevant, and SEO-friendly, without overthinking keywords.
Image Titles, Captions & Descriptions: Know the Difference & Use Them Right
Search engines don’t just “see” your images — they also “read” the metadata attached to them. That’s why optimizing image titles, captions, and descriptions gives you more control over both SEO and content clarity.
1. Image Title
- What it is: The internal label shown in the media library and sometimes as a browser tooltip.
- SEO impact: Minimal, but helpful for organizing files and maintaining keyword relevance.
- Best practices:
- Use 3–5 keyword-rich words
- Avoid auto-generated file names (e.g. IMG_4820)
- Example: t-ranks-seo-agency-dashboard
- Use 3–5 keyword-rich words
2. Image Caption
- What it is: Text displayed below the image on the live page, depending on your theme or layout.
- SEO impact: Moderate. It adds contextual clues for search engines and boosts user understanding.
- Best practices:
- Write 1–2 sentence summaries explaining what the image shows
- Include context or source attribution if needed
- Keep it relevant to the nearby content
- Example: “Graph showing a 40% traffic increase after applying T-RANKS’ link-building strategy.”
- Write 1–2 sentence summaries explaining what the image shows
In WordPress: You’ll see the “Caption” field under the image preview. This shows directly on your post/page where the image appears (if your theme supports it).
3. Image Description
- What it is: A longer field used mainly in the backend. In WordPress, it may appear on image attachment pages.
- SEO impact: Low, but useful for internal reference, especially when managing hundreds of assets.
- Best practices:
- Write a few sentences describing the image purpose, campaign, or content usage
- Useful for designers, editors, and internal media teams
- Example: “This image is part of the Q2 2025 blog series on SEO performance tools, featuring backlink audit visuals.”
- Write a few sentences describing the image purpose, campaign, or content usage
In WordPress: This field appears in the image details window but is hidden from the front-end unless used on an attachment page.
WordPress Upload Fields Summary
| Field | Visible to users? | SEO impact | Purpose |
| Title | Sometimes (tooltip) | ✅ Minor | Internal organization, quick ID |
| Caption | Yes (below image) | ✅ Moderate | Explains image to reader, adds context |
| Description | No (backend only) | ✅ Low | Internal reference or attachment SEO |
Pro Tip: When uploading visuals to WordPress, fill out the title and caption for all key images. Use the description for major assets, like infographics or reused branding visuals. It’ll make your media library searchable, maintain consistency, and enhance SEO context.
Structured Data for Images (Schema Markup)
Structured data helps Google truly understand your images — not just see them. By adding schema (a small block of code), you tell search engines what your image is about, who created it, and how it relates to your page. This extra context can make your visuals appear in Google Images, Discover, and even AI-powered search results.
Why It Matters for SEO
Google relies on metadata and structured data to connect your images with topics, brands, and entities. When done correctly, schema markup can help your images:
- Appear with badges like “Licensable” or “Product”
- Get featured in Google Discover cards
- Gain visibility in visual search tools like Lens
- Strengthen your site’s entity relationships (brand, product, author, etc.)
The Most Useful Schema Types
| Schema Type | Use Case | Important Details |
| ImageObject | For any image on your site | Add url, caption, license, creator, and creditText. |
| Product | Product or eCommerce images | Include image, brand, offers, and reviews. |
| NewsArticle | Blog or news content | Use image, headline, and datePublished. |
| Recipe | Food or cooking content | Add image, name, and ingredients. |
| VideoObject | For video thumbnails | Use thumbnailUrl and uploadDate. |
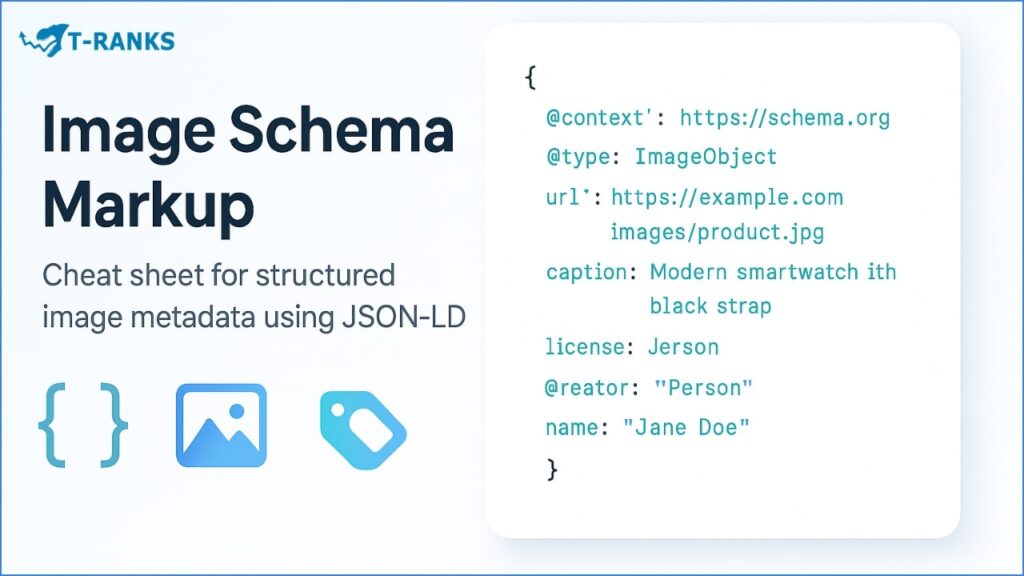
Simple Example: ImageObject Schema
{
“@context”: “https://schema.org”,
“@type”: “ImageObject”,
“url”: “https://t-ranks.com/images/image-seo-guide.webp”,
“caption”: “T-RANKS Image SEO Guide Cover”,
“license”: “https://creativecommons.org/licenses/by-nc/4.0/”,
“creator”: {
“@type”: “Organization”,
“name”: “T-RANKS”
},
“creditText”: “Image by T-RANKS SEO Team”,
“representativeOfPage”: true
}
This small code block gives Google everything it needs: who owns the image, what it shows, and whether it represents the page content.
How to Add Schema in WordPress
If you’re using WordPress or another CMS, you don’t need to code manually. You can use tools like:
- Rank Math – auto-adds schema to posts and product images.
- Yoast SEO Premium – includes built-in structured data blocks.
- Schema Pro – lets you design custom markup templates for image-heavy sites.
Pro Tip: After adding schema, always test it in Google’s Rich Results Test. Even a missing bracket can stop Google from reading your structured data.
Image Optimization & Responsive Delivery: The Foundation of Fast SEO Performance
Optimizing images isn’t just about saving space , it’s about improving how quickly and efficiently your site loads across all devices. Every image you publish impacts your Core Web Vitals, crawl efficiency, and user experience. A well-optimized image loads fast on mobile, stays crisp on desktop, and helps your pages rank better.
Why Image Optimization Matters
- Speed = Rankings. Uncompressed, oversized images slow your site down, hurting Core Web Vitals like Largest Contentful Paint (LCP).
- User Experience. Faster images mean lower bounce rates and higher engagement.
- Mobile-First SEO. Google now indexes your mobile version first, so images must load efficiently on phones and tablets.
- Crawl Efficiency. Smaller images mean search bots can index more pages per visit.
Step-by-Step: How to Optimize Images
- Compress before upload.
- Use TinyPNG, Squoosh, or ShortPixel to reduce file size without losing clarity.
- Aim for ≤ 100 KB for blog visuals and ≤ 200 KB for hero banners.
- Resize to display dimensions.
- Don’t upload 3000 px-wide photos if your content area only displays 1200 px.
- Always set width and height attributes to prevent layout shifts (CLS).
- Use next-gen formats.
- Prefer WebP or AVIF over JPEG/PNG — they’re lighter and load faster.
- Keep JPEG/PNG as fallback for older browsers.
- Leverage responsive delivery.
- Modern browsers can automatically pick the right image size using the srcset attribute or a CDN-based image optimizer.
- Example WordPress plugins: Smush Pro, Optimole, ShortPixel Adaptive Images.
- Use a CDN for images.
- Services like Cloudflare, Imgix, or BunnyCDN serve images from global servers for faster delivery.
Simple Responsive Setup (Example)
<img
src=”image-800.webp”
srcset=”image-400.webp 400w, image-800.webp 800w, image-1200.webp 1200w”
sizes=”(max-width: 600px) 400px, (max-width: 1200px) 800px, 1200px”
alt=”SEO performance graph optimized for mobile and desktop”>
✅ This lets the browser automatically choose the best size — saving bandwidth on mobile while keeping desktop visuals sharp.
Pro Tip: Always test your images in PageSpeed Insights after upload. If “Properly size images” or “Serve next-gen formats” warnings appear, fix them right away — they directly affect SEO scores.
Lazy Loading, Preloading & Priority Hints
Even perfectly optimized images can hurt SEO if they load at the wrong time. Google prioritizes websites that load fast and focus on what users see first. That’s where lazy loading, preloading, and priority hints come in — three powerful techniques that control when and how images load on a page.
Why Loading Strategy Matters
When a page loads, not all images are immediately visible. Loading everything at once wastes bandwidth and delays meaningful content.
- Lazy loading delays non-visible images (like those below the fold) until the user scrolls down.
- Preloading tells the browser which images are most important to load first (like hero or featured visuals).
- Priority hints fine-tune this further, letting you tell browsers exactly which elements deserve early attention.
Done right, these methods boost:
- Core Web Vitals (especially LCP and INP)
- First Impression Speed (how fast key visuals appear)
- User Experience (smooth, stutter-free browsing)
Image Sitemaps: Make Sure Google Finds All Your Visuals
Even the most optimized images won’t rank if Google can’t find them. An image sitemap helps search engines discover pictures that may not be visible in your page code . For example images loaded by sliders, galleries, or lazy-loading plugins.
Why You Need an Image Sitemap
- Google can easily find and index all your images
- Improves visibility in Google Images and Discover
- Useful for eCommerce, blogs, and portfolios with lots of media
How to Create One (Easiest Way)
If you use WordPress:
- Yoast SEO and Rank Math automatically include your images in the sitemap
- Just make sure it’s enabled under “SEO → General → Features → XML Sitemaps”
If you’re on another CMS or a custom site:
- Use Screaming Frog → “XML Sitemap” → check “Include Images”
- Save as image-sitemap.xml and upload it to your main site folder
Submitting to Google
- Go to Google Search Console → Indexing → Sitemaps
- Add the link (for example: https://t-ranks.com/sitemap_index.xml)
- Wait for Google to confirm “Success”
Keep It Healthy
- Update the sitemap whenever you add or delete large sets of images
- Check for broken image links monthly
- Make sure your images aren’t blocked in robots.txt
? Pro Tip
If your site uses lazy loading or a CDN (like Cloudflare or BunnyCDN), Google may miss those images. Adding them to your sitemap guarantees they’re discovered and indexed.
Image Delivery Made Faster with CDNs
Even if your images are well-optimized, they can still load slowly for people far from your server. A Content Delivery Network (CDN) fixes this problem by saving copies of your images in different countries. When someone visits your site, the CDN loads the image from the nearest location ,not from your main hosting server.
Think of it like having mini-servers all around the world, each ready to show your images instantly.
Why a CDN Helps SEO
- Loads images faster: No matter where the visitor is, the image comes from a nearby server.
- Better Google scores: Faster pages mean better Core Web Vitals and rankings.
- Improves user experience: Visitors stay longer when pages load smoothly.
- Handles high traffic easily: CDN servers share the load, keeping your site stable.
Easy Ways to Use a CDN
If you’re using WordPress, you don’t need to be technical:
- Install a plugin like Jetpack, Smush Pro, or LiteSpeed Cache.
- Turn on the “Image CDN” or “Optimize Images” option.
- Your image links will now look like this:
- From: https://yourwebsite.com/image.webp
- To: https://cdn.yourwebsite.com/image.webp
That’s it — your images now load faster for everyone.
Good CDN Options
| CDN Name | Best For | Why It’s Good |
| Cloudflare | Small to medium websites | Free, simple setup, global coverage |
| BunnyCDN | Agencies and bloggers | Fast, low-cost, reliable |
| Cloudinary | E-commerce or heavy visuals | Auto-resizes and converts formats |
| Jetpack CDN | WordPress beginners | Works out of the box, no setup hassle |
Pro Tip: If you serve international visitors, enable auto-formatting in your CDN. It automatically delivers WebP or AVIF versions based on each visitor’s browser — making your pages lighter and faster without extra work.
Caching & Browser Optimization: Keep Your Images Loading Lightning-Fast
Every time someone visits your site, their browser has to download your images.
Caching saves a copy of those files so when they come back , or move between pages the browser doesn’t need to load everything again. This makes your site feel instant, even on slower internet connections.
Why Browser Caching Helps SEO
- Speeds up repeat visits: Returning visitors see your pages load almost instantly.
- Improves Core Web Vitals: Faster load times lead to higher LCP (Largest Contentful Paint) scores.
- Reduces server stress: Cached images don’t have to be downloaded again, saving bandwidth.
- Better user experience: Fast sites keep users longer and reduce bounce rates — both SEO signals.
How It Works (In Simple Terms)
When someone opens your site:
- Their browser saves a copy of your images in a small local cache.
- The next time they visit, the browser loads those cached images instead of downloading them again.
- You control how long those files stay cached by setting an expiry time.
Example:
<IfModule mod_expires.c>
  ExpiresActive On
  ExpiresByType image/webp "access plus 1 year"
  ExpiresByType image/jpeg "access plus 1 year"
  ExpiresByType image/png "access plus 1 year"
</IfModule>
✅ This simple code tells browsers to store your images for one year — great for assets that rarely change (like logos or icons).
Easy Caching Setup in WordPress
No need to touch code if you’re using WordPress — just install one of these plugins:
- WP Rocket – Adds caching, GZIP compression, and image preload automatically.
- LiteSpeed Cache – Free and effective for both caching and image optimization.
- W3 Total Cache – Lets you control cache expiry times for each file type.
After enabling caching, check PageSpeed Insights — you should see “Serve static assets with an efficient cache policy” turn green.
Pro Tip:
For images that you update often (like product photos), change the file name or add a version tag (e.g., product-1-v2.webp). This ensures browsers fetch the new version instead of using an outdated cached copy.
Visual Search Optimization: Google Lens, Pinterest & AI Discovery
Search is no longer just about text it’s also about what people see. With tools like Google Lens, Pinterest Lens, and AI-driven results in Google Search. The users can now find your content by scanning or uploading images instead of typing keywords. This is the new frontier of Image SEO , Visual Search Optimization.
Why Visual Search Matters
- Google Lens & AI Overviews: Millions of searches now begin with photos, screenshots, or scanned products.
- Pinterest & Social Discovery: Platforms like Pinterest, Instagram, and even YouTube use image data to suggest similar content.
- E-commerce Advantage: Visual search helps users find matching products — directly from photos.
If your images are properly described and tagged, they can appear in AI-powered search panels, shopping carousels, and image-based recommendations.
How to Optimize for Visual Search
- Use clear, unique, and high-quality visuals. AI tools recognize shapes, logos, and objects — not just colors. Avoid heavy filters or text overlays.
- Add descriptive filenames and alt text. Example:
- ❌ IMG1234.webp
- ✅ blue-running-shoes-men-t-ranks.webp
- Include brand elements in visuals. Add small, non-intrusive logos or watermarks. This helps Google associate your brand identity with image-based results.
- Use structured data and context. Mark up your images with Product, ImageObject, or Article schema (already covered earlier). This helps Google “see” the image in context.
- Leverage Pinterest SEO.
- Upload high-quality, vertical images (2:3 ratio).
- Add keyword-rich titles and pin descriptions.
- Link each pin back to your site to earn backlinks and traffic.
- Optimize for Google Discover.
- Use high-resolution featured images (minimum 1200 px wide).
- Avoid watermarks and excessive text.
- Ensure your pages have reliable authorship and strong E-E-A-T signals.
Example: Product Image for Lens & Discover
A product photo titled “T-RANKS SEO Audit Dashboard” with:
- Filename: t-ranks-seo-audit-dashboard.webp
- Alt text: “T-RANKS SEO audit dashboard with backlink and ranking analytics”
- Structured data: ImageObject + Product
- Caption: “T-RANKS Dashboard visualizing keyword rankings and backlink growth”
This image could appear in Google Lens results, Pinterest search, or AI Overview panels for users looking up “SEO analytics tool.”
Pro Tip: Regularly perform a reverse image search (via Google Images → camera icon or Lens) for your own visuals. If others are using them without credit, you can:
- Politely request attribution with a backlink.
- Ask them to remove the image if it’s used without permission.
- Leverage unauthorized use as an outreach opportunity for link building.
Accessibility, Branding & Trust: Build Images That People and Search Engines Believe In
In modern SEO, images are more than visuals , they’re signals of credibility. Google’s algorithms evaluate how your visuals represent expertise, accessibility, and authenticity. Clear, consistent, and inclusive images build trust with both your visitors and search engines.
1. Accessibility: Make Every Image Understandable
Accessibility ensures everyone including visually impaired users can interpret your content. It’s also a key part of user experience signals Google uses to assess quality.
How to make images accessible:
- Use clear alt text that accurately describes the image content and context.
- Avoid filler phrases like “image of” or “picture showing.”
- Maintain strong color contrast between text and background (important for infographics).
- Choose readable fonts and avoid tiny text overlays.
- Never rely on color alone to convey meaning (e.g., use symbols or labels in charts).
✅ Example: “Bar chart showing 2025 SEO traffic growth for T-RANKS clients.” ❌ Not ideal: “Chart” or “Image of SEO results.”
Accessible images make your content usable, inclusive, and aligned with Google’s Page Experience signals.
2. Branding: Stay Consistent Across Every Visual
Consistency creates familiarity and familiarity builds trust. When all your images follow the same design language, users instantly recognize your brand anywhere they see it.
Brand consistency checklist:
- Use your brand color palette and typography in all graphics.
- Add a subtle logo or watermark to branded visuals (like infographics).
- Keep your tone and style aligned — e.g., minimal, professional, or playful.
- Reuse visual templates for blog headers and social previews.
These small touches help Google connect your images with your brand entity, reinforcing E-E-A-T (Experience, Expertise, Authoritativeness, Trustworthiness).
3. Authenticity: Use Real, Original Images
Users and Google trust what looks real. Stock photos are fine in moderation, but overused or generic images weaken credibility.
How to stay authentic:
- Feature real team photos, your actual office, or genuine product shots.
- Replace generic “handshake” or “people smiling” stock photos with branded alternatives.
- Create your own data visuals or infographics from verified information.
- If using AI-generated images, ensure they are realistic, relevant, and disclosed appropriately.
Original visuals perform better in image search, Discover, and AI Overviews because they add unique context search engines can’t find elsewhere.
Pro Tip: Add author markup and organization schema to your content pages that feature key visuals. This links your images to verified entities (your business or author profile), improving both trust signals and Discover visibility.
Monitoring, Testing & Continuous Improvement
Image SEO doesn’t end after optimization ,it’s something you maintain. As you add new content, update visuals, or change site design, it’s important to keep checking how your images perform. Regular testing helps you spot slow-loading pages, missing alt text, or images that have fallen out of Google’s index.
1. Track Image Performance
Your best tool here is Google Search Console.
- Go to Search Results → Search Type → Image
- Review impressions, clicks, and pages that drive the most image traffic
- Look for images with high impressions but few clicks — they might need a better caption, context, or surrounding text
You can also use PageSpeed Insights or Lighthouse to monitor:
- Image loading times and compression issues
- “Serve next-gen formats” and “Properly size images” alerts
- Largest Contentful Paint (LCP) visuals that load too slowly
✅ Tip: Always check which image contributes to your LCP metric — often, that’s the hero or featured image.
2. Audit & Refresh Regularly
Think of this as housekeeping for your visuals.
- Remove unused or broken images
- Recompress large or unoptimized uploads
- Replace outdated visuals or branding
- Update alt text when the page focus changes
A quarterly image audit keeps your site lean, fast, and fresh — and helps you detect crawl or indexing gaps early.
3. See How Google Views Your Images
Try these quick checks:
- Run a site:image search (e.g., site:t-ranks.com) to see what’s indexed
- Use Google Lens or reverse image search to check where your visuals appear online
- Verify that your branded or original images show up in Discover and AI Overviews
If you find others using your visuals without credit, request attribution — it can turn into a valuable backlink opportunity.
4. Future-Proof Image SEO (2026 & Beyond)
Search is becoming more visual, contextual, and AI-driven. Here’s what to prepare for:
- AI Recognition: Google can identify logos, faces, and brand-specific visuals.
- Next-Gen Formats: AVIF and JPEG XL will replace WebP for lighter, sharper results.
- Multimodal Search: Visuals will combine with voice and text for hybrid queries (e.g., “Show products like this”).
- Entity Linking: Branded visuals will connect directly to verified Knowledge Panels and About Pages.
Keeping your visuals updated, fast, and well-labeled ensures long-term visibility in this evolving landscape.
Pro Tip: Once a month, check Google Search Console → Image tab and review Page Experience or Core Web Vitals reports. Even small improvements like resizing a hero image or adding structured data can keep your site ahead in image-based discovery.
Conclusion
In conclusion, effective Image SEO is about more than shrinking file sizes or naming files correctly. It’s about making every visual on your site work together: fast loading, accessible, and meaningful to both users and search engines. From compression and lazy loading to schema markup and brand consistency, each step helps your images earn visibility in Google Images, Discover, and AI-powered search results.
Consistent testing, structured optimization, and visual trust-building form the foundation for long-term success. As visual and AI search continue to evolve, the websites that treat images as assets, not extras, will lead in both visibility and credibility.
Pro Tip: Ready to optimize your site visuals for 2026 and beyond? Let T-RANKS help you implement a complete image SEO strategy that boosts rankings, performance, and brand authority.
FAQs Of Image SEO
What is Image SEO?
Image SEO means optimizing your images so search engines can understand, index, and rank them. It includes compression, alt text, structured data, and file naming to improve visibility across Google Images and AI-powered search.
Why does Image SEO matter for Google rankings?
Optimized images improve Core Web Vitals, accessibility, and topical relevance. These signals help boost your overall page ranking and increase organic traffic from both visual and web search.
How do I properly optimize an image for SEO?
Compress the image, use a descriptive file name, add alt text, and place it near related content. This balance of speed and context helps both users and search engines interpret your visuals correctly.
Which image format is best for SEO performance?
WebP is currently the most effective format for SEO. It delivers sharp quality at smaller file sizes, improving page speed and Core Web Vitals while maintaining compatibility with modern browsers.
How big should my images be for web optimization?
Aim for under 100 KB for blog visuals and under 200 KB for large banners. Smaller images load faster, which directly improves user experience and ranking metrics.
What is alt text and why is it important?
Alt text describes an image’s content for users and search engines. It supports accessibility for visually impaired users and helps search crawlers understand image context for indexing.
Do captions improve image SEO?
Yes, captions provide visible context to readers and additional keyword signals for search engines. A relevant caption can increase engagement and clarify the purpose of an image.
What tools can I use for image compression and optimization?
Tools like TinyPNG, ShortPixel, and Squoosh help compress images without losing quality. They also convert to next-gen formats like WebP or AVIF automatically for better performance.
How can I check if my images are indexed on Google?
Search with site:yourdomain.com in Google Images or use Google Search Console’s Image report. These tools show which visuals are indexed and how much traffic they generate.
What is lazy loading and how does it improve SEO?
Lazy loading delays image downloads until users scroll near them. It reduces initial load time and improves Core Web Vitals, especially for image-heavy pages.
Does structured data affect image ranking?
Yes, adding ImageObject or Product schema helps Google understand image ownership, license, and context. It can also increase chances of appearing in rich results or Discover.
What’s the future of Image SEO in 2026?
Search will continue shifting toward AI-based visual recognition. Next-gen formats like AVIF, multimodal search (text + image), and entity-linked visuals will dominate ranking factors.